Overview
I think it’s important to keep in touch with technology and maintain a hands-on perspective so that what you talk about is not just theoretical but practical and based on fact. As hardware becomes more and more abstracted and lab environments end up being in the cloud or within some virtual environment where you don’t physically manage the storage, it’s easy to get complacent and lose sight of how far we have come in the industry. My background is very much from a hardware perspective, but it was because of necessity. I built what I could with what I had always trying to make the best from the worst. I never paid more than a few hundred dollars for a home lab that could easily rival many small to mid sized networks. In the same way that some people tinker with classic cars, I tinker with computer parts that are 10 to 20 years old. Taking the state of the art from several generations past, that it would have been thousands of dollars to purchase. Now they’re difficult to give away, unless you have a certain way of seeing them for what they are. Tap it into their hidden capabilities, and later on new software that gives them life that they would have never had had otherwise.
In this article I will show my process of setting up:
- Ubuntu 24.04 Desktop
- Software RAID 1 on SSDs for VM storage
- LVM volume with software RAID1 on HDDs with an SSD cache
- QUEMU/KVM virtualization
- Cockpit web management (with plugins for VM mgmt, storage, network)
- MicroK8S for container management
- SAMBA server for files sharing
My Hardware
I have an HP Z640 workstation with the following specs:
- 2 x CPU E5-2623 v3 @ 3.00GHz
- 96GB of DDR4 RAM
- 2 x 250GB SSD
- 2 x 1TB SSD
- 2 x 4TB HDD
This machine is about 9 years old. Initially I ran this machine with Nutanix CE for about a year, and it worked fabulously. I was able to run VMs, container, use the AOS distributed storage fabric for high performance self healing storage. It was great! I even ran a NVIDIA P40 GPU in it to run local LLMs for AI workloads.
However the virtualization industry is ever evolving. I encountered a telephony provider (not a telco) that previously had embedded ESXi into their telephony appliance, so they could run multiple VMs for the different functions required. They were happy with the solution and provided it for years to clients. Recently, Broadcom killed off the embedded ESXi program and forced this company to stop bundling ESXi into the solution. They also could not resell VCF, even at 10x the cost, because they were not premier partners. So the alternative was to look at other options in the industry, such as the open source QEMU/KVM solution. Running on a single server with local disks, KVM and Cockpit for management was what the telephony company provided as an interim alternative as they pivot to something else in the future.
So this article is about how to take a bad idea full of risk, and put some BBQ sauce on it. In other words, no money, old equipment, providing modern capabilities, with some performance and resilience.
Nutanix AHV also uses KVM as part of the core hypervisor component, but it is only a small fraction of the overall solution. Let me break down how the opensource components work. Remember, this is core hypervisor functionality which is considered in the industry as table stakes, and commodity. Whether its ESXi, KVM, Hyper-V, or otherwise, all these Type 1 hypervisors have comparable performance. Type 2 hypervisors like VirtualBox, VMware Workstation/Fusion are not meant for production. They are utility / lab environments and have big performance hits in comparison.
How QEMU and KVM Work Together
QEMU and KVM collaborate in a split-architecture model where each component handles distinct virtualization tasks, combining flexibility with near-native performance. Here’s how they interact:
1. Role Division
- KVM (Kernel-Based Virtual Machine):
- QEMU:
2. Communication Workflow
- Initialization:
QEMU opens
/dev/kvmto access KVM’s kernel interface[4]. - VM Creation:
QEMU issues
ioctl(KVM_CREATE_VM)to request a VM context from KVM[4:1]. - vCPU Setup:
QEMU allocates vCPUs via
ioctl(KVM_CREATE_VCPU)and maps guest memory[3:1][4:2]. - Execution Loop:
while (1) {
  ioctl(KVM_RUN);  // KVM executes guest code on hardware
  switch (exit_reason) {
    case KVM_EXIT_IO:
      QEMU emulates I/O;  // Handles disk/network ops
    case KVM_EXIT_HLT:
      QEMU suspends VM;
  }
}
When the guest triggers I/O or interrupts, KVM exits to QEMU for emulation[5][3:2].
3. Performance Optimization
- Hardware Acceleration: KVM uses CPU extensions to run guest code directly on physical cores, avoiding emulation overhead[1:2][2:1].
- Emulation Efficiency: QEMU only intervenes for device/hardware interactions, minimizing context switches[3:3].
- Shared Memory: Guest RAM is mapped directly to host memory via KVM, reducing duplication[2:2].
4. Unified Management
- Libvirt Integration:
Tools like
virshor Virt Manager use libvirt to coordinate QEMU-KVM, simplifying VM control[2:3][3:4]. - Configuration Synergy:
QEMU’s
-accel kvmflag enables KVM acceleration, while KVM relies on QEMU for device models[6][5:1].
Key Takeaway: KVM acts as the performance engine for CPU/memory virtualization, while QEMU serves as the hardware emulator and orchestrator. Together, they enable high-speed virtualization with broad hardware compatibility[1:3][5:2][3:5].
High-Level Summary of process
- Prepare your HW. Plan your layout.
- Update BIOS and enable VT and optimal features
- Install OS and perform initial partitioning
- Configure video drivers
- Run updates
- Configure RAID 1 on SSDs for VM Storage
- Set Up LVM Volume with Software RAID 1 on HDDs, Adding an SSD Cache
- Configure network bridging so your VMs aren’t NAT’d
- Install and Configure QEMU/KVM Virtualization
- Set Up Cockpit Web Management and Plugins
- Deploy MicroK8s for Container Management
- Configure SAMBA Server for File Sharing
- Create system users / SAMBA users
- Migrate files onto platform
So why would we do this when the existing lab works well?
The idea of a lab is to try new things, to experiment on your own time so you understand the effects of design and the trials of operations, in a safe environment. Still, always have multiple infrastructures so you can backup and recover your lab if and when you break it trying the coolest new thing.
1. Scope and Motivation
I am very familiar with the full breadth of the Nutanix portfolio as an alternative to Broadcom for the entire Software-Defined Datacenter stack. From simplifying 3-tier infrastructure, legacy storage systems, and complex networking environments, to a single platform that is very easily deployable and manageable. In the Enterprise, and at scale, I think there is no better option. However, what about the SMBs, the small companies that don’t have any budget and want to sweat their assets as much as possible without investing in anything new? In these environments, risk can spread out across multiple assets that have a high probability of failure, but a low probability that they will all fail at the same time. So by spreading the HW failure risk across many assets, mitigating the risk of any single point of failure, and employing in-depth monitoring, automated recovery, environment healing, and a comprehensive DR strategy, you can operate with high availability and resiliency for a very small expense.
Here is where the risk is: Operational maturity, triage response time, incident response, technological acumen, tribal knowledge, and non-standard practices. If you do not have all of those addressed and continually evaluate risk as it applies to the business and services availability, then I do not recommend the strategy.
This reminds me a bit of the race, called the 24 hours of lemons (as opposed to Le Mans), where the rules are that the car can’t be worth more than $500, and needs to drive around a track for 24 hrs.
Operating an IT environment like this in production requires so much more technical capability and expertise, that in the end it is not cheaper, and the risk is huge.
Where it does make sense to do this?
- A lab environment that does not provide production-level service availability.
- A startup that is bootstrapping its way by any means necessary
- A company going out of business that needs to keep the lights on as long as possible
- An organization that is trying to continue to operate during a natural disaster or in an active conflict area.
The step by step process:
Complete Home Lab Setup Guide
1. Ubuntu 24.04 Installation
Boot from Live USB:
- Create bootable USB with Ubuntu 24.04 Desktop ISO
- Boot from USB → “Try or Install Ubuntu” → “Install Ubuntu”
- Partition /dev/sde:
| Partition | Size | Type | Mount Point |
|---|---|---|---|
/dev/sde1 |
1GB | Ext4 | /boot |
/dev/sde2 |
20GB | Swap | swap |
/dev/sde3 |
Remainder | Ext4 | / |
2. Post-Installation GRUB Configuration
sudo nano /etc/default/grub  # Change to: GRUB_CMDLINE_LINUX_DEFAULT="nomodeset"
sudo update-grub
sudo reboot
Verification: cat /proc/cmdline should show nomodeset
3. RAID Configuration
sudo mdadm --create /dev/md0 --level=1 --raid-devices=2 /dev/sda /dev/sdb  # 1TB SSD RAID1
sudo mdadm --create /dev/md1 --level=1 --raid-devices=2 /dev/sdc /dev/sdd  # 4TB HDD RAID1
4. LVM with SSD Caching
sudo pvcreate /dev/md1 /dev/sdf
sudo vgcreate vg01 /dev/md1 /dev/sdf
sudo lvcreate --type cache-pool -L 250G -n cache_pool vg01 /dev/sdf
sudo lvcreate -L 7.5T -n lv01 vg01 /dev/md1
sudo lvconvert --type cache --cachepool vg01/cache_pool vg01/lv01
5. Mount Configuration
sudo mkfs.ext4 /dev/md0
sudo mkfs.ext4 /dev/vg01/lv01
sudo mkdir -p /mnt/vol00 /mnt/vol01
sudo mount /dev/md0 /mnt/vol00  # VM storage
sudo mount /dev/vg01/lv01 /mnt/vol01  # Cached data

# Create directories
sudo mkdir -p /mnt/vol00/vm /mnt/vol01/iso /mnt/vol01/smb/home
6. Virtualization Setup (QEMU/KVM)
sudo apt install qemu-kvm libvirt-daemon-system virt-manager -y
sudo usermod -aG libvirt,kvm $(whoami)
newgrp libvirt
7. Network Bridge Configuration
# Identify network interface
IP_LINK=$(ip link | awk '/enp|eth/ {print $2}' | cut -d: -f1 | head -1)

# Create bridge
sudo nmcli con add type bridge ifname br0 con-name br0
sudo nmcli con add type ethernet ifname $IP_LINK master br0 con-name br0-slave
sudo nmcli con down "$(nmcli -t -f NAME c show --active | head -1)"
sudo nmcli con mod br0 ipv4.method auto
sudo nmcli con up br0

# Integrate with libvirt
cat <<EOF | sudo tee /etc/libvirt/qemu/networks/br0.xml

  br0


EOF
sudo virsh net-define /etc/libvirt/qemu/networks/br0.xml
sudo virsh net-start br0
sudo virsh net-autostart br0
8. Cockpit Management
sudo apt install cockpit cockpit-machines cockpit-storaged -y
sudo systemctl enable --now cockpit.socket
9. MicroK8s Deployment
sudo snap install microk8s --classic
sudo usermod -aG microk8s $(whoami)
newgrp microk8s
microk8s enable dns dashboard storage
10. Samba Configuration
sudo nano /etc/samba/smb.conf  # Add:
[HomeShare]
path = /mnt/vol01/smb/home
valid users = user01, user02
read only = no
browsable = yes

# Create users
sudo useradd -m user01 && sudo useradd -m user02
sudo smbpasswd -a user01 && sudo smbpasswd -a user02
sudo systemctl restart smbd
Final System Structure
| Component | Device/Partition | Size | Mount Point | Purpose |
|---|---|---|---|---|
| Boot Partition | /dev/sde1 |
1GB | /boot |
Kernel/initramfs |
| Swap Partition | /dev/sde2 |
20GB | N/A | Swap space |
| Root Filesystem | /dev/sde3 |
235GB | / |
OS files |
| VM Storage | /dev/md0 (RAID1) |
1TB | /mnt/vol00 |
Virtual machines |
| Cached Data Volume | /dev/vg01/lv01 |
4TB+250GB | /mnt/vol01 |
Primary data storage |
| SSD Cache | /dev/sdf |
250GB | N/A | LVM cache |
Network Bridge Configuration
| Element | Name | Type | Purpose |
|---|---|---|---|
| Physical Interface | enpXsX |
Ethernet | Host network connection |
| Bridge Interface | br0 |
Bridge | Virtual machine network access |
| Libvirt Network | br0 |
Bridged | VM network selection in virt-manager |
Key Operations
- VM Creation: Use
/mnt/vol00/vmas storage path and selectbr0network - File Sharing: Access via
\\\HomeShare(Windows) orsmb:///HomeShare(Linux) - Management:
- Cockpit:
https://:9090 - Kubernetes:
microk8s kubectl get all -A
- Cockpit:
This configuration transforms legacy hardware into a modern lab with redundant storage, accelerated I/O, bridged networking, and unified management. Remember, this will be a killer lab, just not production.
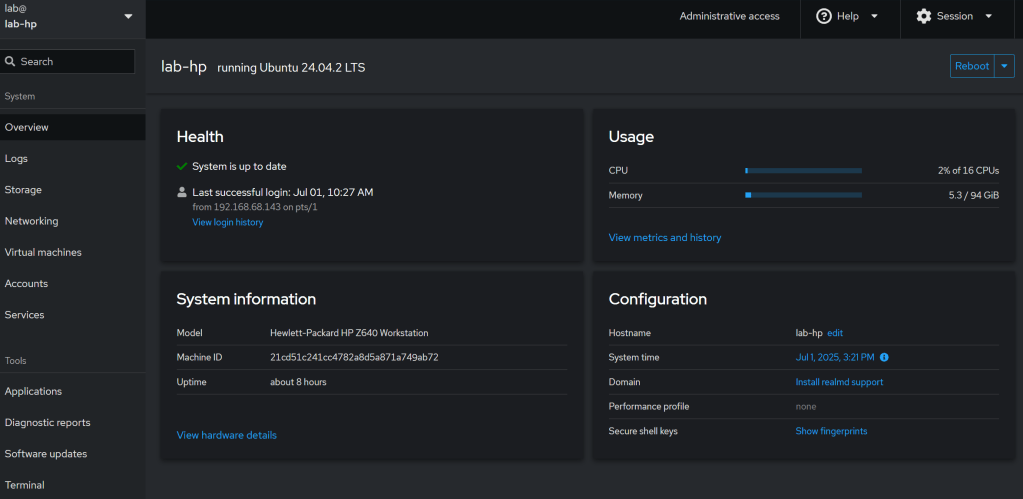
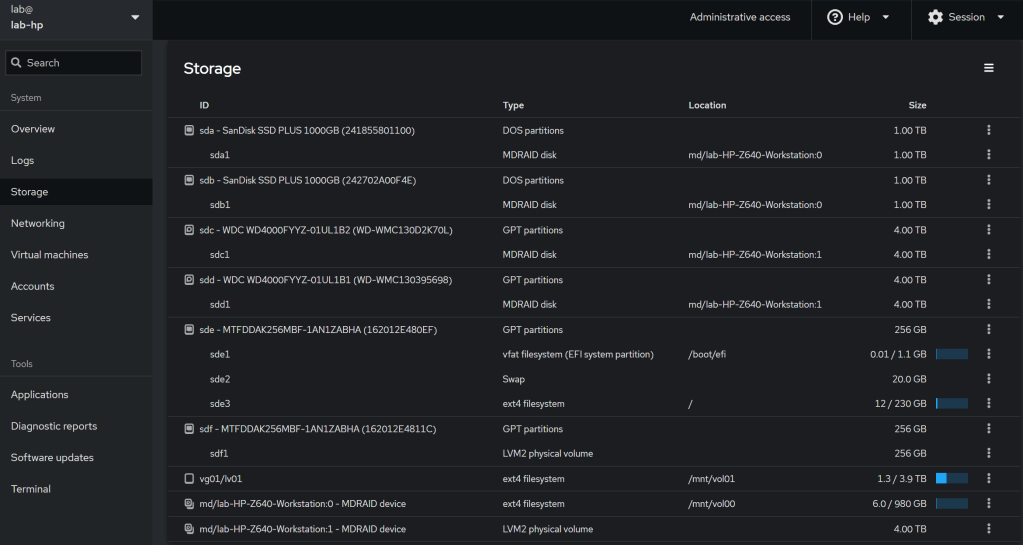
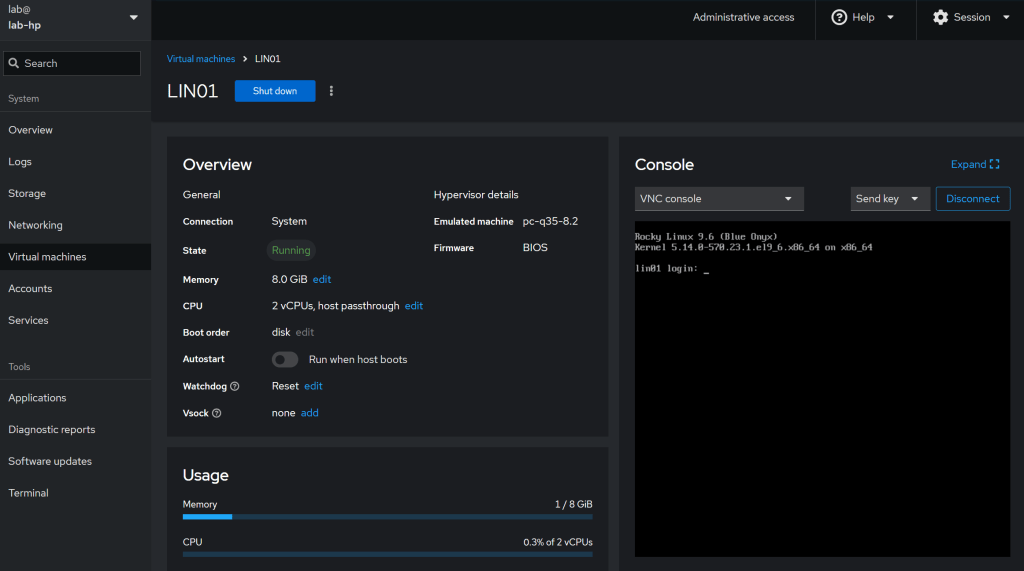
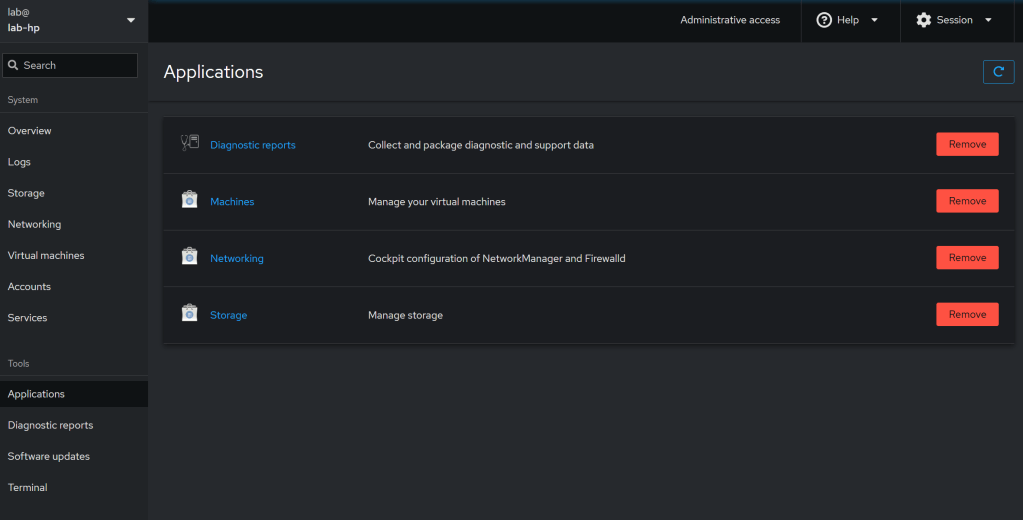
Cockpit Screenshots

Conclusion:
Now that I have done this, I can tell you my thoughts on the process.
- Ubuntu is a great operating system, that is very easy to deploy and manage. Easy to use and very forgiving of old hardware.
- The RAID and lvm management would have been very difficult without using an AI copilot to figure out the syntax and understand all the concepts, and validating it worked correctly, initialized, synced, etc. There is no simple UI for that, and if you do it wrong, then everything will break.
- Networking also would have been very difficult without an AI copilot. There are multiple ways to configure it, and it can be pretty convoluted. By default you only have NAT enabled VMs, which is pretty useless if you want external systems to communicate with your VMs..
- Cockpit was created by RedHat to provide a web interface to system management and some VM capabilities. It is very bare bones, and if you want to do anything besides create a VM with simple parameters, power on, or delete it, you will have to go to the command line.
I think that from a perspective of manageability, resilience, performance, and recoverability, that Nutanix provides a better solution for small companies than using something like this. Ultimately it would be cheaper and less risky, than the effort required to keep it running safely.
On the other hand, if your scenario is one of the ones I mentioned earlier in the article, then keep this in your toolbelt.
- A lab environment that does not provide production-level service availability.
- A startup that is bootstrapping its way by any means necessary
- A company going out of business that needs to keep the lights on as long as possible
- An organization that is trying to continue to operate during a natural disaster or in an active conflict area
- HomeLab with Ubuntu, KVM, Cockpit, Kubernetes, and cache-enabled Software RAID

- AHAGAI – Day 6 of 30 – Fika and Ikigai in the era of AI

- AHAGAI – Day 3 of 30 – Kaizen and the method of continual improvement in the era of AI

- Episode 11 – How to use Generative AI to be a better person – Daemon Behr

- Addressing Gaps in Open-Source LLM Vulnerability Scanners

Discover more from Designing Risk in IT Infrastructure
Subscribe to get the latest posts sent to your email.
